
Melted Crayon Pumpkin | This is one of our favorites and one that we’re going to attempt this year. The easiest way to do this pumpkin is to peel the crayons and glue them to the top of the pumpkin, in a circle. A half crayon works fine, and you’re going to want to make sure that you’ve covered the surface in newspaper. Work with a hair dryer, but don’t hold it too close to the wax, you don’t want to heat the pumpkin too much. Use the heat setting, and watch the crayons melt on the pumpkin to make a fun design that’s perfect to brighten up a gloomy night, or spooky decorations.
Tip: Use red to make the ‘spookiest’ pumpkin
Embroidered Pumpkin | Use a screwdriver or drill to make small holes in the pumpkin. You can choose to make a grid, or a design and let the kids work with an oversized plastic needle and wool to create an embroidered design. There are many templates (use halloween cross stitch patterns) that you can find online, or you can choose to let them create a freehand design of their own. For younger kids, you can show the basics of creating the designs, and even use more than one color. It would be a great way to practice letter making, too.
Thumbtack Pumpkin | Have some fun thumb tacks at-home? Give older kids an easy way to make a design that’s simple, and will take a few moments to create something unique. Afterwards, you can always re-use the thumb tacks (if you wish), making it a simple design.
Glitter and Glue Pumpkin | A paintbrush, some glue and glitter is all that you need to decorate the glitter and glue pumpkin. You can choose a simple design like polka dots, or let the kids paint the entire pumpkin and choose the glitter that they are going to use on the design.
Mummy Pumpkin | Have you seen the monstrous googly eyes at your local craft store? Pair those with an inexpensive roll of gauze from the dollar store, or from the pharmacy and you’re got an inexpensive way to create a hilarious (and kind of spooky) pumpkin, that’s perfect for Halloween.
Decoupage Pumpkin | Halloween tissue paper is easy to find, and it’s inexpensive. Paired with a container of glue and a paintbrush, you can create a halloween pumpkin that’s going to look great inside or out. Take this a step further and use a drill to create holes throughout the pumpkin to create a spooky, and unique way to decorate the porch for Halloween.
The Doughnut Pumpkin | Use paint to create a loop around the top of the pumpkin, in the shape of a doughnut. From there, you can use colored pipecleaners or colored crayons sliced in small pieces to resemble sprinkles, depending on the size of your pumpkin. Attach these and your Sprinkle-doughnut-pumpkin is finished (and almost good enough to eat).
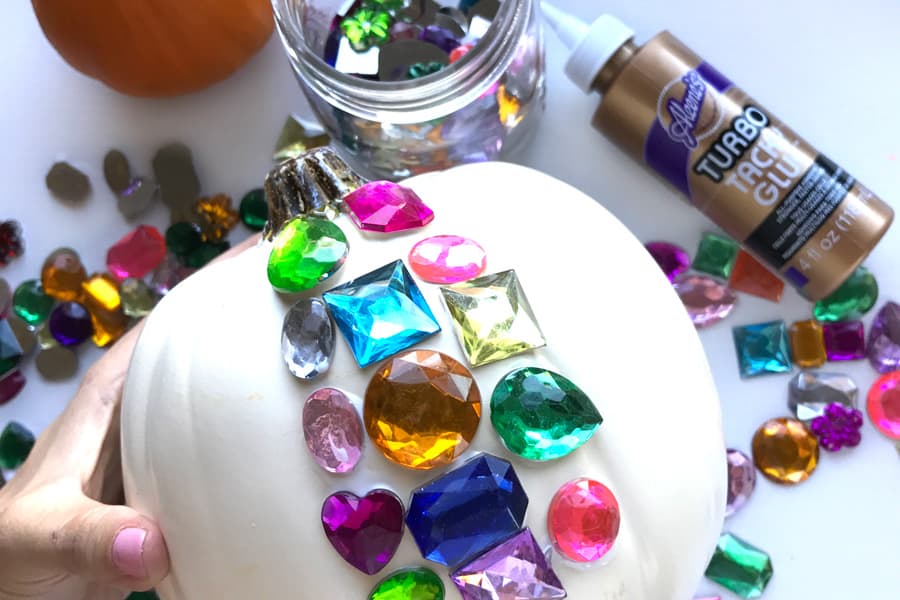
Rhinestone Pumpkin | Get out those large rhinestones and your favourite fast-drying glue and create one of these pumpkins inspired by Ooly (pictured above). It’s a gorgeous decoration that you’re going to want to pull out year after year – and let’s face it – what kid doesn’t like creating a collage?
Since we’re spending Halloween away from home this year, we’re excited to tackle some of these with the plastic pumpkins from Michaels Stores, that way – we’re going to be able to use them for multiple years, and the kids still get that festive celebration of creating pumpkins for Halloween.
You may also like
-
Halloween-Themed Slots You Can Play in Canada
-
GUIDE: Daytime Halloween Events and Activities for Kids in Edmonton on October 31
-
10 Places You Can Go Trick or Treating Indoors in Edmonton
-
Kids Get Free Admission to Prairie Gardens Haunted Pumpkin Festival October 25-27, 2019
-
You Can Watch Toy Story 4 (and a Halloween Flick) at the Drive in on Friday Night